Exporting
The process of turning your After Effects composition into a finished video can be a little confusing. Let’s quickly review the process.
Your first step should be trimming the timeline so that only the section you want will be exported. When you create a new composition, you are asked to define its length, but if you need to change its length, you can do so by going to Composition>Composition Settings… or using the Cmd+K keyboard shortcut. Changing the duration in the composition settings window that appears will either add or subtract time from the end of the composition. However, you can also trim the composition down from within the timeline panel.
At the beginning and end of the timeline, you’ll find blue handles – these define the “work area.” (There are actually two sets of blue handles – the smaller ones can be used to zoom the view of the timeline in and out.) You can think of the work area handles as After Effects’ equivalent of an in and out point. If you drag the work area handles to the section of the timeline you want to keep, then right-click on the lighter area directly between them, you’ll see a few options appear. Select “Trim Comp to Work Area” to remove everything outside the handles and shorten the length of the composition. However, even if you don’t want to trim the comp down, you should use the blue handles to choose the area you want to export.

Once you have your work area defined, you should export your composition using the Render Queue. The Render Queue exists as a panel in After Effects – it may show up as a tab next to the compositions in the timeline (otherwise, you can always find it under the Window dropdown at the top of the screen).

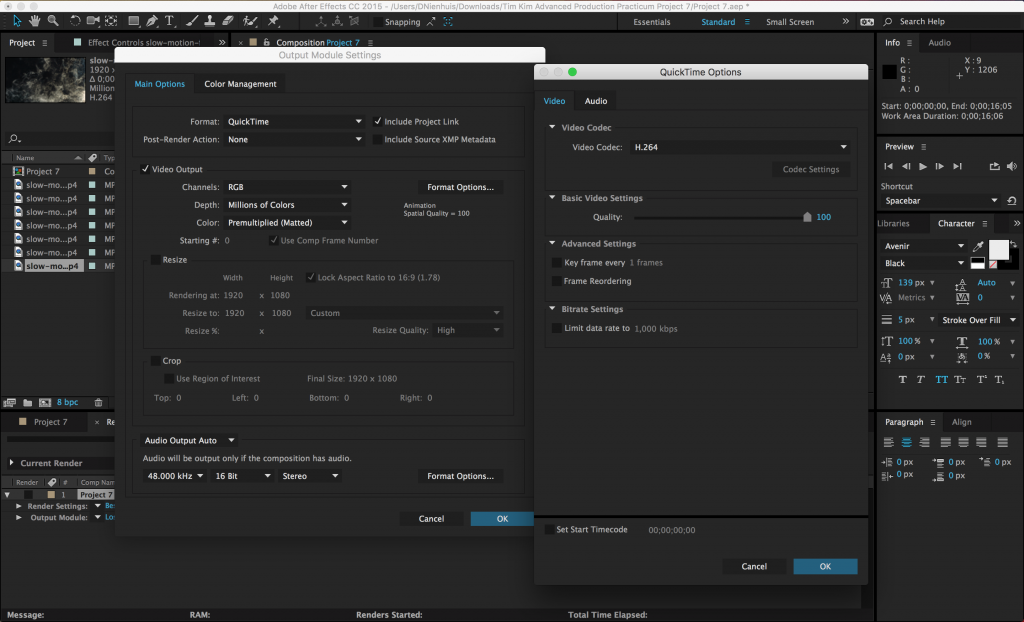
To add a composition to the Render Queue, open the composition in the timeline, then go to Composition>Add to Render Queue. The name of the composition should then appear in the Render Queue panel. Before you hit the “Render” button, you’ll need to set a few parameters. Unless something has been changed, everything in the Render Settings section should be fine at the default values. The Output Module is where you actually make changes to the file type and codec, so click on that to bring up a window with lots of options. For our purposes, just click on “Format Options…” and change the video codec to H.264. Click OK to close each window. Finally, set the file’s destination by clicking on the text next to “Output To:”.

So, to recap: start by defining the work area you want to export in your composition, then go to Composition>Add to Render Queue from the top menu, click on the word “Lossless” next to “Output Module”, choose QuickTime as the format, click “Format Options…” and choose H.264. Click “OK” on the two open windows to get back to the Render Queue, click on the blue text (it may say “Not yet specified”) next to “Output To” and choose the destination and name of the file. Click the blue “Render” button in the corner, and your video will be created.