Crawl Before You Walk
You can download some files at this link to follow along with the lesson today. For a “classic” walk cycle, I’ve provided a realistically-proportioned puppet in a side view. Depending on your character’s design, you may need to modify the poses used – or your character may not walk at all. A robot character might roll on wheels or a ghost character might float. Regardless, walk cycles are a fundamental skill for character animators, so it’s important to learn the basics.
Walk cycles are also notoriously challenging, so try not to feel discouraged if things don’t look right at first.
Import and Rig Your Character
Now that you (hopefully) have your main character designed and created, you should be ready to import it into After Effects and get it rigged and ready for animation. Remember that you can continue to tweak your character as you go by opening the Illustrator or Photoshop file and making adjustments. However, making major changes that alter the overall shape of your character or modify the layer structure will cause problems for the imported file. In other words, don’t import your puppet until you are generally happy with their design and layout.
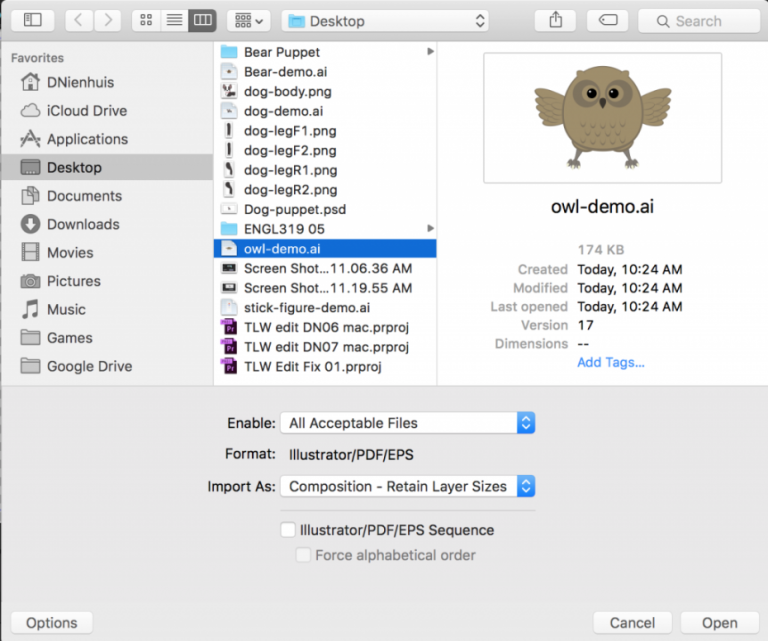
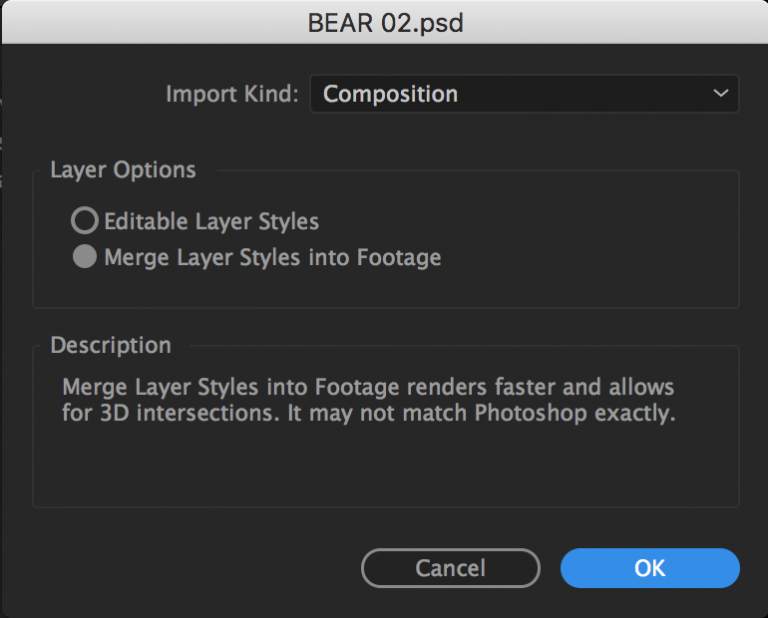
If you’ve created your character in Photoshop or Illustrator, remember that you need to change the import settings when you bring in your file. Under “Import As:” select “Composition – Retain Layer Sizes.” Also make sure that the “Sequence” setting (below “Import As:”) is not checked. If you have everything set up correctly, your file will be imported as a new composition with the different layers separated.
We’ve already covered the basics of setting anchor points and parenting for puppets, but let’s quickly review the process. First, use the Pan Behind tool (Y) to move the anchor points to their appropriate locations. If you have a simple puppet, you might just have layers for the arms, legs, body, and head. If you have a more complex puppet, you might have layers for the individual fingers, hands, forearms, upper arms, upper and lower legs, feet, toes, torso, hips, neck, head, facial features, articles of clothing, and more. In either case, remember that the anchor points should be placed at the point around which you want the layer to rotate. The hands rotate at the wrist, the forearms rotate around the elbow, the upper arms rotate at the shoulder, and so on. If you have separate layers for the torso and hips, set their anchor points near the waist of your character.
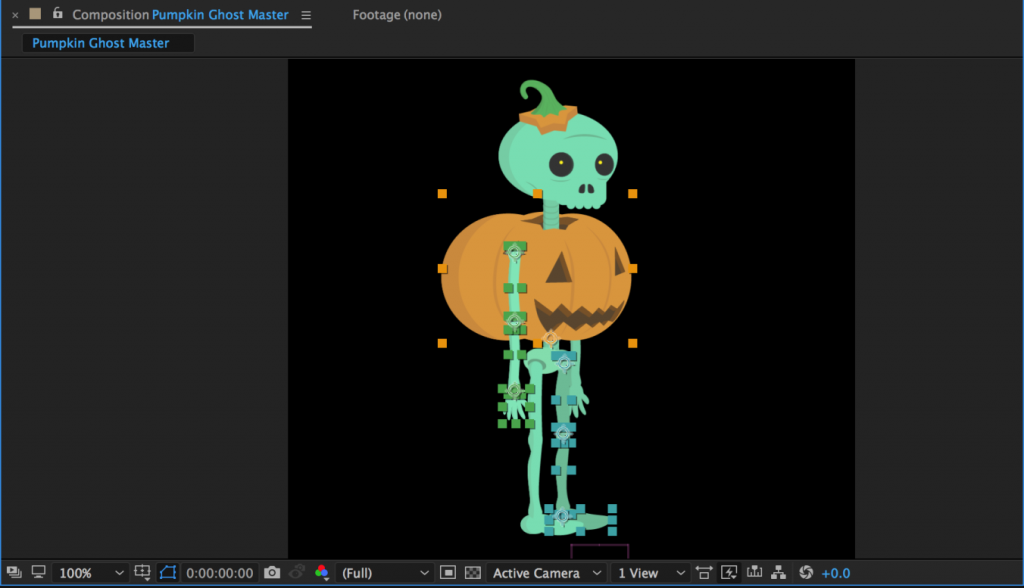
Once everything has its anchor point placed appropriately, it’s time to parent the layers. Fingers are parented to the hand, hands are parented to forearms, forearms are parented to upper arms, upper arms are parented to the torso, etc. If you have separate torso and hips layers, you can parent the torso to the hips to allow your character to bend at the waist. This will most likely make your hips layer the top parent layer – the “root” layer that everything is ultimately connected to. You could also parent either the hips or both the hips and torso to a null object (Layer>New>Null Object). This will act as a sort of “master control” layer. Null objects can be useful for other layers as well – they can be used to control parts of your puppet that are difficult to select because they are small or are covered by other layers. I often find it helpful to create a null object to control the eyes of a puppet.
As you parent the layers to each other, test them out by rotating them with the rotate tool (W). If something looks wrong, check the location of the anchor point, the overall position of the layer, and the parenting order.
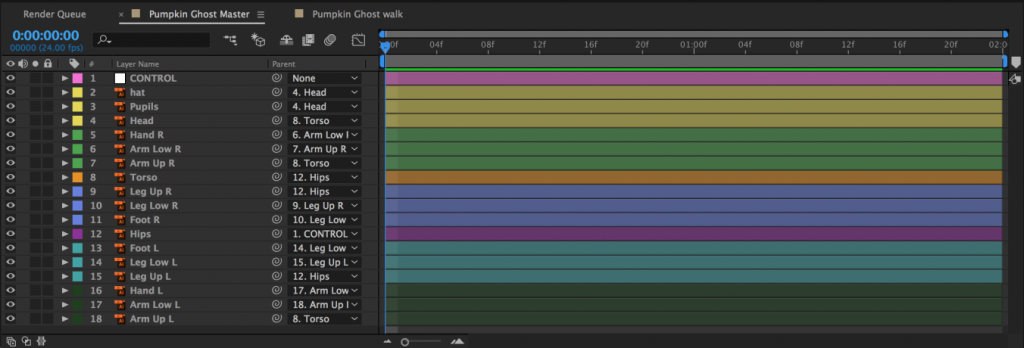
If you planning on animating your character using the puppet pins tool, use it to place deformation pins on the layers of your puppet. The more pins you add, the less each one does, so for very exaggerated elastic movement, only use a few pins – three is a good bet for the “rubber hose” effect on arms and legs. If this is the style of animation you want, place a pin at the shoulder, elbow, and wrist. Adding more pins will create subtler deformation and if you want to limit the influence of a certain pin, you can place additional pins in the areas you want to hold down.
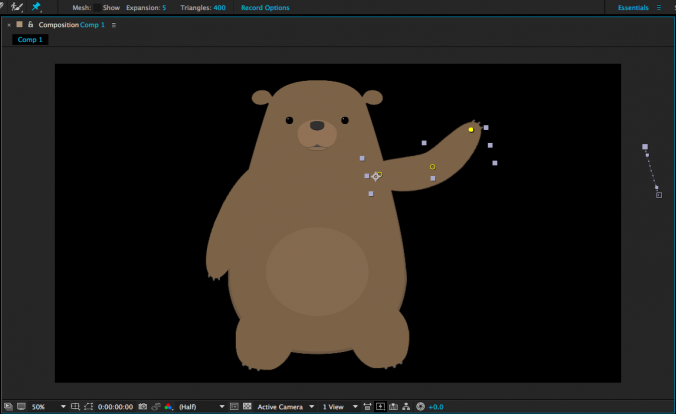
When you have everything anchored, parented, and pinned, take a moment to ensure that your layers are named appropriately. You may also want to color code the various layers by clicking on the small colored square next to the layer name in the timeline panel. Use whatever system makes sense to you – you could make the left leg and left arm layers the same color, for example, or you could give everything a unique color. I like to make whatever the “top” or “master” layer happens to be a nice bright color so that I can find and select it quickly.
Once your puppet is rigged and organized, do not start animating directly within the composition you have imported. Instead, name the layer something like “Character Rig Master” and keep it as a reference. You can duplicate the composition or copy and paste the layers within it into other compositions to actually do your animation. Getting your puppet correctly rigged takes time and you don’t want to have to do it more than once. Since you will probably be using several copies of your puppet throughout your project, it makes sense to keep one composition as a reference that you can copy from.
Creating A Walk Cycle
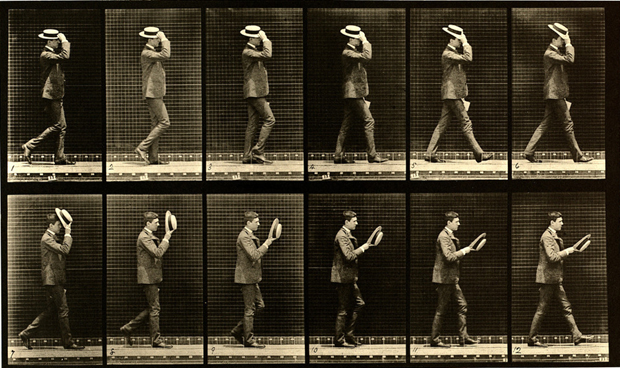
Now it’s time to tackle one of the most challenging things in character animation – walking. Walking is one of those actions that’s both ubiquitous and surprisingly complicated. When a walk looks wrong, it sticks out noticeably – good walk cycles appear effortless. The way a character walks also tells the audience a lot about their personality, mood, age, and more. It’s an important skill for any character animator to work on. Mastering it takes a lot of practice.
We’ll be creating a walk cycle that can be looped in After Effects. Because it loops, we only need to animate a short section – probably a second or two – but a lot needs to happen in that time and the cycle needs to end exactly where it begins. This is what allows the animation to be played over and over seamlessly.
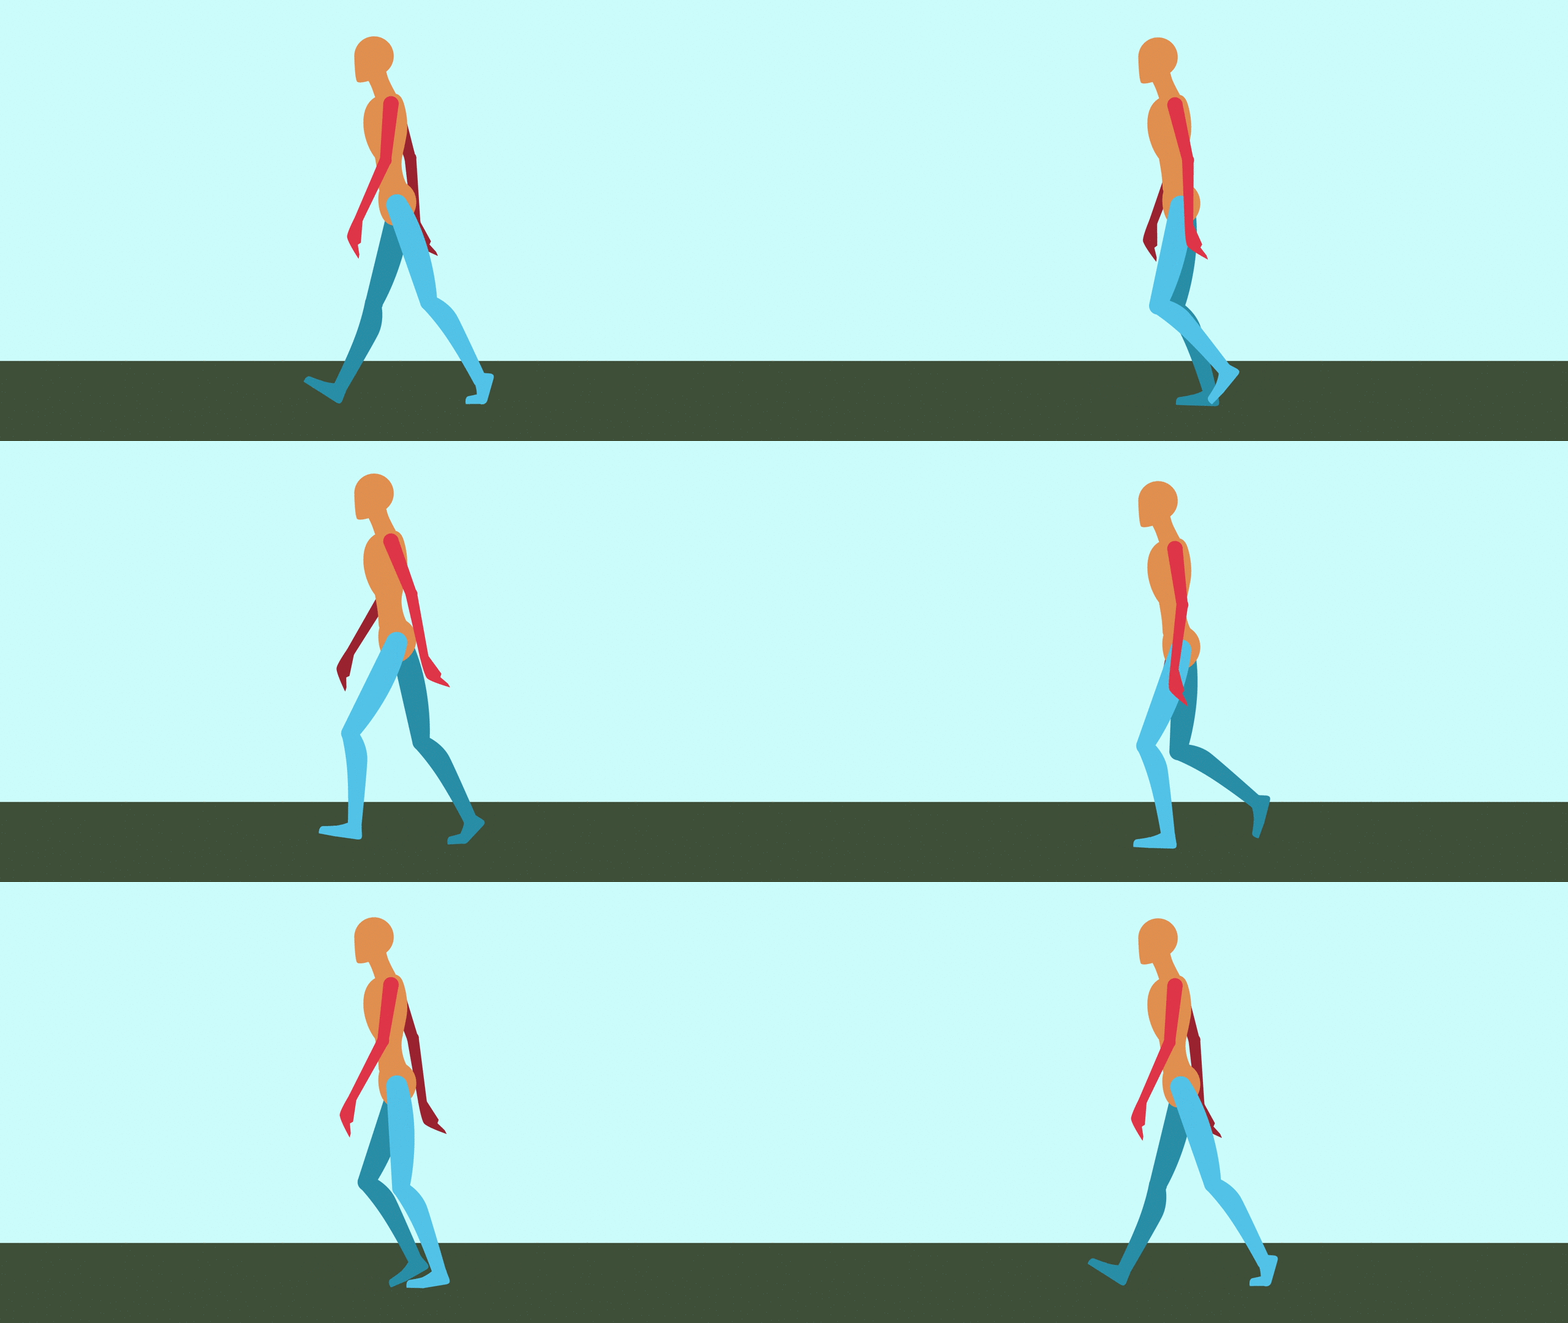
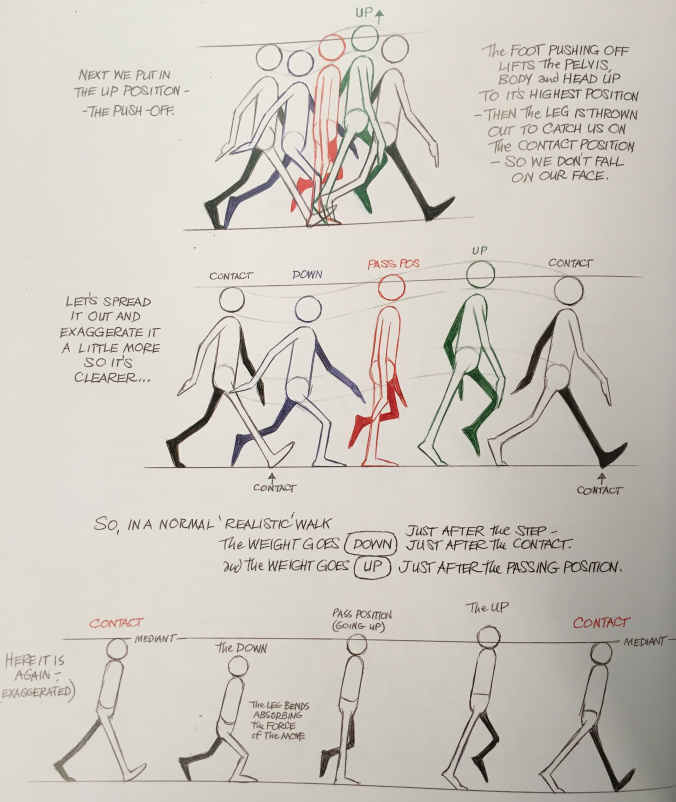
Animator Alan Becker, whom you may remember from his animated explanations of the twelve basic principles of animation, breaks walk cycles down into four key poses. The two most important poses are “contact” and “passing.” During the contact post, one foot is extended forward and just touching the ground. During passing, that leg goes back and the opposite leg passes it, moving forward. The cycle then repeats with the opposite legs contacting and passing. The other two poses are “down” and “up”, which correspond with the body raising and lowering slightly during the walk. The head is at its lowest point after contact and its highest point after passing. The arms generally swing opposite the legs, so the left arm is forward when the right leg is making contact. However, there is a fair amount of flexibility in how the arms can be animated – for example, they can hang forward listlessly to make the character seem downtrodden.

Using Becker’s technique, you end up with a total of nine poses in a loop: the four poses for the first step (leg A moving in one direction, leg B moving the opposite direction), the four poses for the second step (with the directions of legs A and B reversed), and the final pose which is the same as the first. This will result in a very realistic walk.

This technique can be simplified, however. If we remove the “up” and “down” poses, you end up with a five pose loop: contact and passing for the first step, contact and passing for the second step, and back to the original contact pose. When you animate a walk cycle this way, you may find that you need to raise the puppet a bit on the passing pose – the up and down poses help the feet raise and lower appropriately and removing them can cause the legs to arc downwards. The result is a walk cycle that is less realistic than the nine pose loop, but simpler to animate.

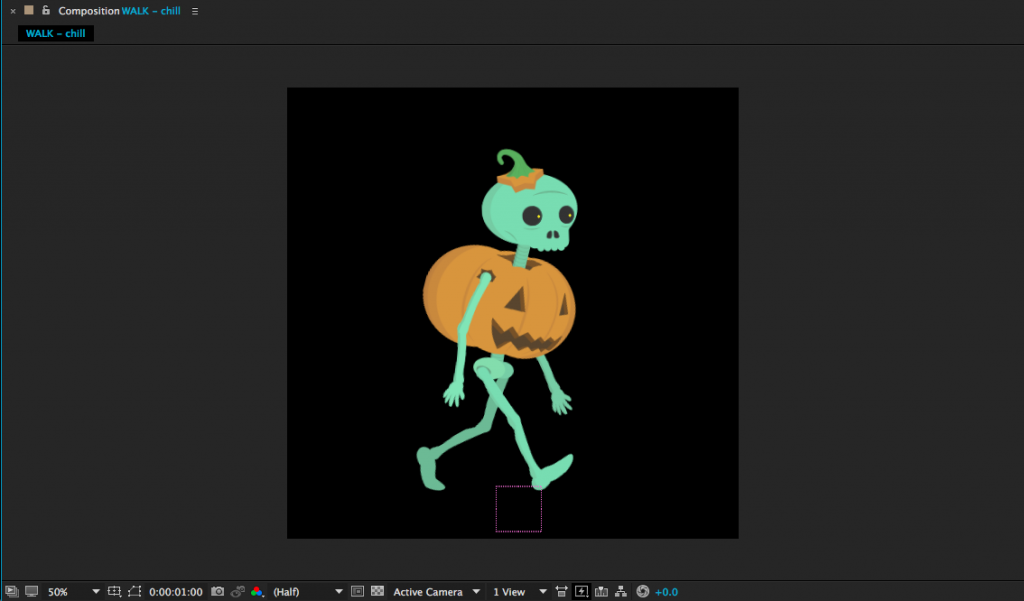
Contact: Right leg forward, heel just hitting the ground. Left leg back, toe about to lift.
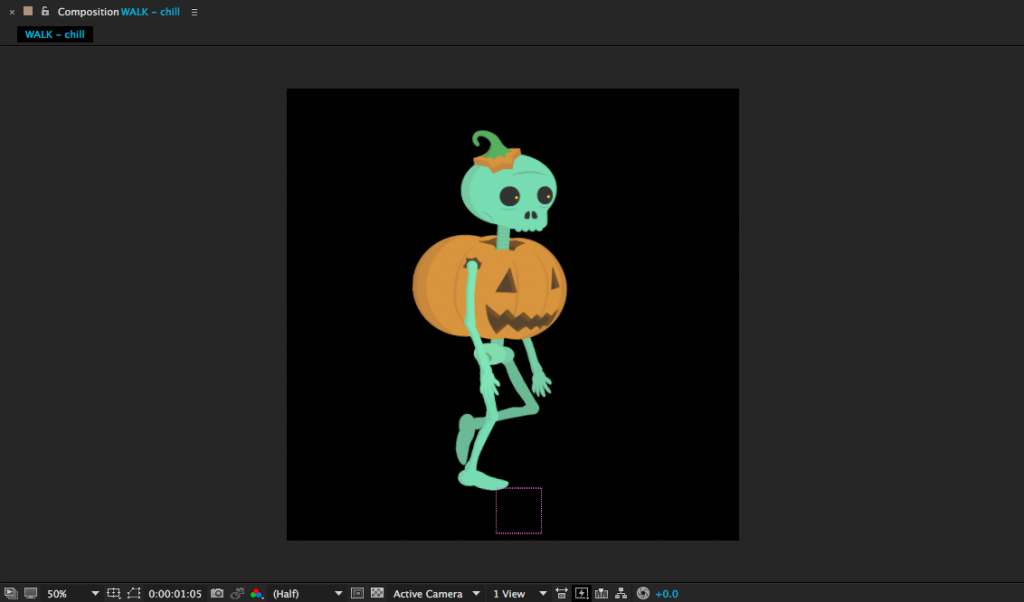
Passing: Right leg center, planted. Left leg bent and lifting forward, passing the right.
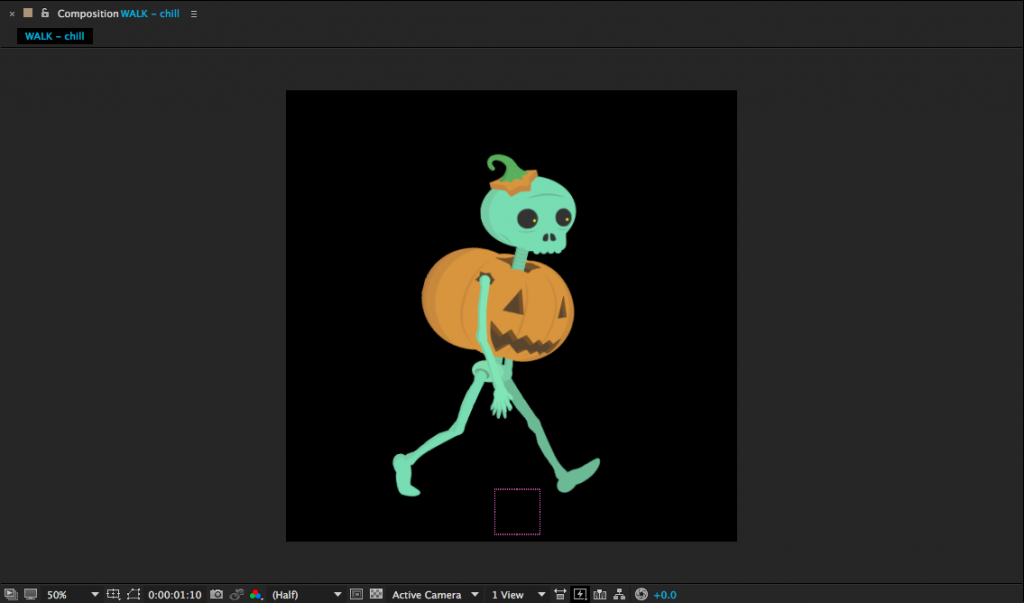
Contact: Right leg back, toe about to lift. Left leg forward, heel just hitting ground.
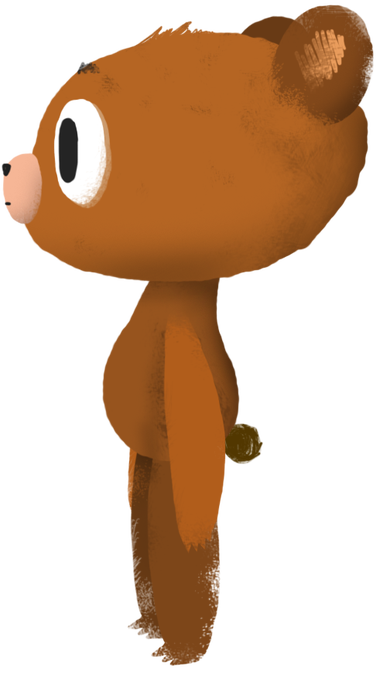
Here’s another take on walk cycle animation, by the talented and snarky Ross Plaskow. Plaskow animates using puppet pins, but you should be able to adapt his technique to characters that are animated only using rotation and position keyframes. Plaskow’s walk cycle takes only 16 frames to complete and loops seamlessly. If you would like to download the bear puppet that he uses in the tutorial, you can find a slightly simplified version of it here.
Here are a few tips, if you find yourself feeling frustrated:
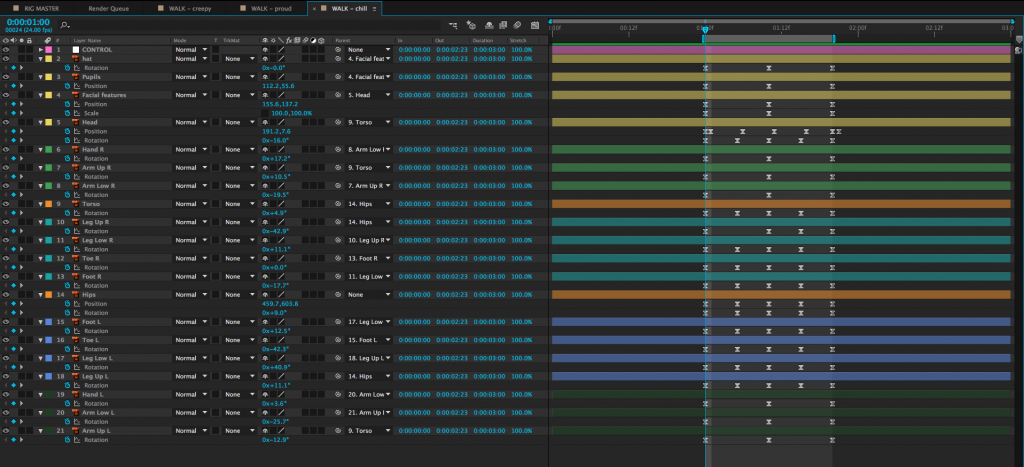
- Follow Plaskow’s example and rearrange your panels. It’s very helpful to be able to see all the layers in the timeline at once. You can easily switch back to a standard view when you finish the walk cycle.
- The arms are easy to animate, so save them for last and start with the legs. Either animate one leg at a time or one pose at a time. Take it slowly.
- Don’t neglect the “passing” pose – it’s important. If you skip the passing pose, the legs will sort of “sweep” instead of lifting naturally from one step to another.
- Subtle movements carry a lot of weight. It’s easy to overdo things like rotation and the up and down movement of the head.
- Try working on a very slow walk cycle – several seconds – and then shrink all your keyframes closer together to speed it up. It’s sometimes easier to work with more space on the timeline, but fast walk cycles generally look better.
- Make sure that your puppet is in exactly the same position at the beginning and end of the walk cycle.
- Use the work area handles in the timeline to define the length of your walk cycle. You can preview only the work area (on a loop) using the controls in the Preview panel. The 0 (zero) key on the number pad is the keyboard shortcut for this.
- Try creating a “floor” using a solid as a point of reference – it can help you visualize where the feet should be hitting. When you are finished, you can delete or hide the layer.
- Walk cycles look more believable with lots of overlapping movement. Adding small amounts of animation to the rotation of the torso, the position of the head, the sway of the hands, etc. help sell the overall effect.
- Walk cycles usually look terrible until you are about 80% done with the process of animating them. Keep plugging away.
- This kind of animation is notoriously challenging – don’t feel frustrated if you don’t get it correct right away.

Making a Loop
A walk cycle is just that – a cycle. That means that it can be looped over and over as much as needed. As long as the first frame of the cycle and the last frame of the cycle are identical, the loop should be seamless. You can loop animation in a few different ways. You could, for example, copy and paste the keyframes over and over again. You could also bring the entire walk cycle composition into another comp and duplicate it. However, there is a much more efficient way of looping animations in After Effects – using expressions.
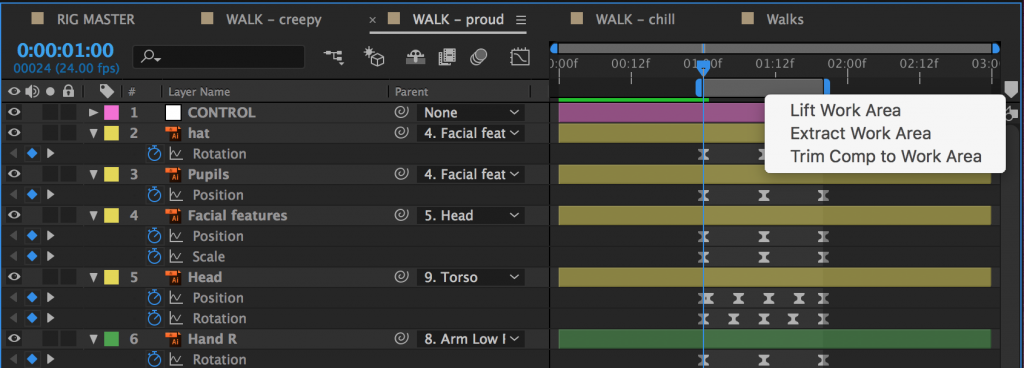
The first step in creating a looping walk is to isolate the walk cycle itself. In your walk cycle comp, position your work area handles around the walk cycle, if they aren’t already. Right-click on the lighter grey area between the handles and choose “Trim Comp to Work Area.” The composition will shrink down to only the area in the work area, which will probably be less than a second for a walk cycle.
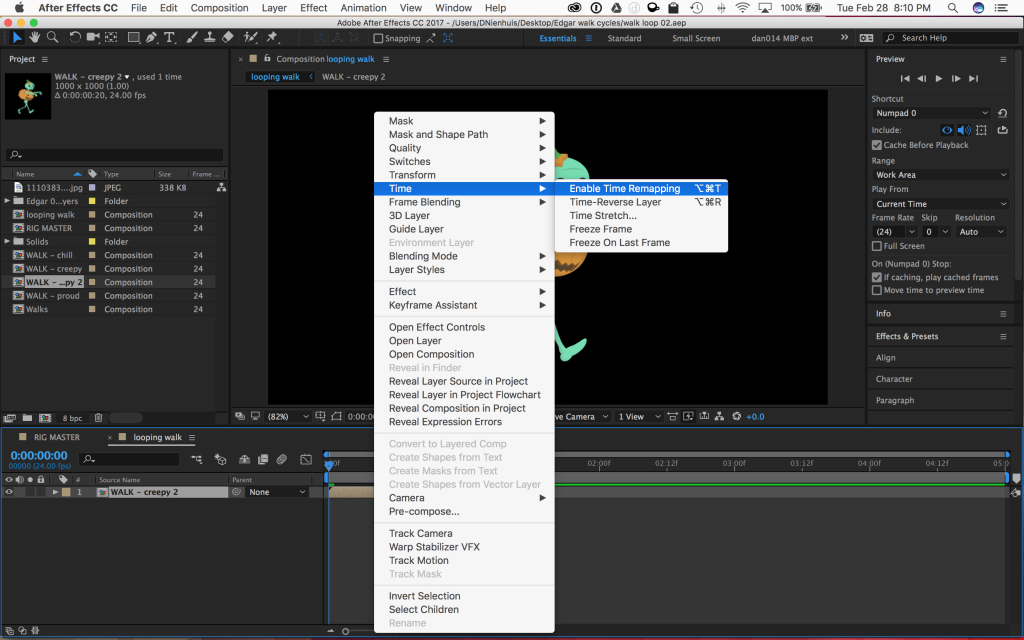
To create a loop of the walk cycle, you’ll need to be working in a different composition. So create a new one (longer than the walk cycle composition) and drag the walk cycle comp into it. Right-click on the walk cycle comp in the timeline and go to Time>Enable Time Remapping. Click it.
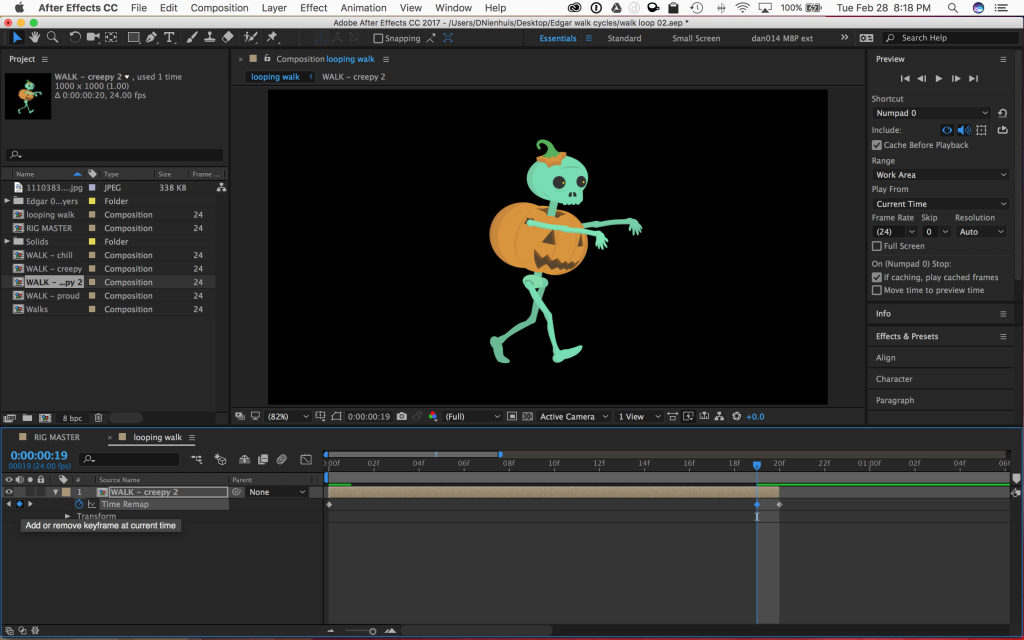
A new property called “Time Remap” should appear under the layer name. You should also see a keyframe appear at the beginning and end of the composition. Time Remapping is actually a very powerful property in After Effects – it allows us to speed up or slow down footage, or freeze it completely. It also allows us to create an animation loop using an expression.
The expression we’ll be using loops all of the keyframes for a given property. We’ll be looping the Time Remap property to create an endless walk cycle. However, because of the way that After Effects creates compositions, the last keyframe in a time-remapped composition is actually blank – if you go to the last frame of your walk cycle comp in the timeline, you’ll probably see a blank screen. So, go to the last frame, then go back a frame and press the “create keyframe” button in the timeline (it looks like a blank keyframe and can be found to the left of the layer name in the timeline). Then delete the keyframe at the very end of the comp.
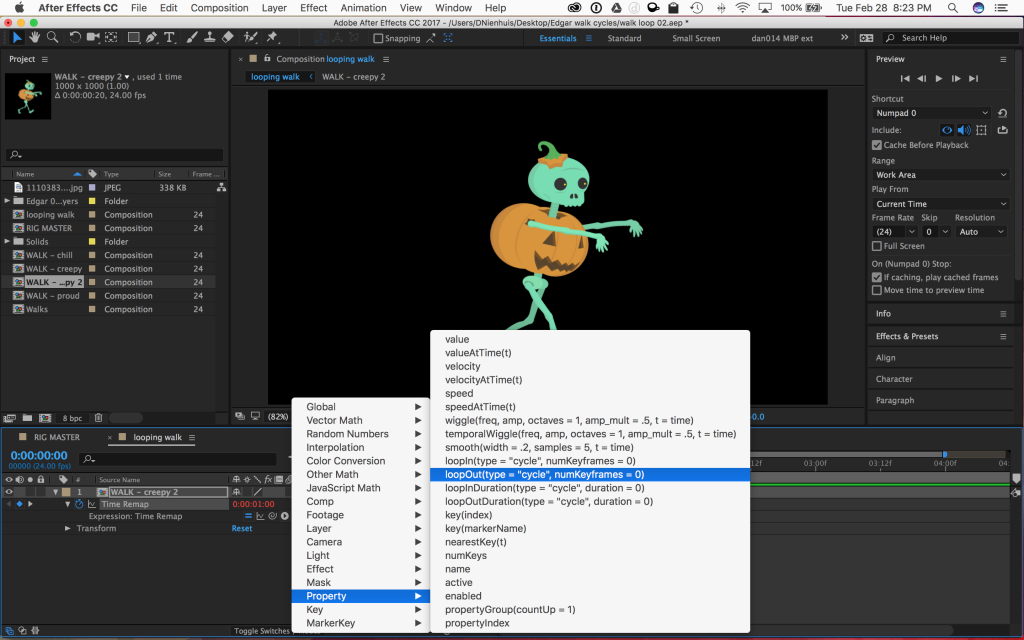
With keyframes at the beginning and end of the walk cycle animation, it’s time to add the expression. We’re going to be adding this expression to the Time Remap property, so alt-click on the stopwatch icon next to “Time Remap.” The expression text window should appear in the timeline, along with the expression controls.
On the left of the timeline, you should see a series of icons next to the words “Expression: Time Remap.” One looks like an equals sign, one looks like a graph, one is the pick whip, and the last one looks like a little “play” symbol – an arrow in a circle. Clicking on this last one brings up a menu with different expressions that can be inserted. Go to Property and select loopOut(type = “cycle”, numKeyframes = 0). It’s about halfway down the list. Click on it and it should be added to the expression in the timeline. Click out of the text window or hit “enter” on the keyboard to exit the text editing mode.
Any keyframes for that property – and there should only be two, one at the beginning and one at the end – should now loop for the length of the layer. Click and drag the end of the layer to make it longer. If you preview the composition, you should see the walk cycle animation looping and the character walking continuously.
Here’s a quick recap of the steps:
- Trim the walk cycle comp to the exact length of the cycle.
- Drag the trimmed walk cycle comp into a different composition.
- Right-click on the walk cycle comp in the new comp and select Time>Enable Time Remapping.
- If the last keyframe in the layer is blank, create a keyframe at the last frame of actual walk cycle animation and delete the blank one.
- Alt-click on the Time Remap keyframe icon to create an expression.
- From the expressions menu, select Property>loopOut(type = “cycle”, numKeyframes = 0). Hit “enter” or click out of the text area.
- Extend the walk cycle comp as long as you like.
That may seem like a lot of steps, but it goes quite quickly once you are used to the process. Once you have the expression set up correctly, you can copy the looping walk cycle from one layer to another easily – and make the walk cycle as long as you want. The loop out expression works with other properties as well, so feel free to experiment; if things start to look strange, you can always remove the expression by alt-clicking on the stopwatch icon.

Project 11: Walk This Way
You may not need to use a walk cycle in your final project, but it’s still something you should practice making. For this week’s assignment, finish the walk cycle we worked on together in class and send me a video clip of it looping for five to ten seconds. If you’d like to modify the puppet or add a background, feel free!
