Categories
Quick Reviews

Quick Review: Keyboard Shortcuts

Work Smarter

Keyboard shortcuts can be the difference between muddling through a program and mastering it.  Courtesy of No Film School and School of Motion, here are some extremely useful shortcuts to help you work faster in After Effects.

Layer Properties

  • A (Anchor Point), P (Position) S (Scale) R (Rotation) and T (Opacity)

View More Properties

  • Hitting one of the above hotkeys (APSRT), plus Shift.

Quickly Set Keyframes

  • Opt + A, P, S, R, T (Mac)
  • Alt + Shift + A, P, S, R, T (Windows)

Reveal All Keyframed Properties

  • Select the layer and hit U (also works for multiple layers.)

Access the Hand Tool

  • Hold down the spacebar and drag.

Timeline Zoom

  • Zoom into the timeline by pressing + or –

Zoom Into the Comp Viewer

  • Just use comma “,” or period key “.”

Fit Your Comp to the Viewer

  • Hit Shift + / and your composition will go full screen.

Quick Ease for Your Keyframes

  • Hit F9 (fn and F9 on Mac)

Jump Keyframes

  • Jump from keyframe to frame by using the J & K key.

Hop Layer Frames

  •  Hop between layer frames by using the I and O keys (for the first and last, respectively)

Move From Frame to Frame

  • Page Down and Page Up
  • or Cmd + Right Arrow and Cmd + Left Arrow

Preview Twice as Fast

  • Hit Shift + 0 on the Number Pad.

See All Manipulated Properties

  • Double-tap the U key.

Quickly Add Markers to the Timeline

  • To add a marker hit the * key on the number pad.
  • Set a marker with text hold down shift + *.

Precompose Your Layers

  • Cmd + Shift + C

Easily Move Layers

  • Move layer to current playhead location by hitting ” &”

Move Playhead to Beginning or End of Composition

  • Home or End keys

Scale Layers to Fit

  • Cmd + Opt + F

Toggle Guides On/Off

  • Cmd + R

Different Viewer Resolutions

  • Full: Cmd + J
  • Half: Cmd + Shift + J
  • Quarter: Cmd + Opt + Shift + J

Replacing Layers

  • Hold Option + Replace

Select Layers

  • Cmd + Down or Up Arrow

Split Layers 

  • Cmd + Shift + D

Show the Graph Editor

  • Shift + F3

Search for Layers

  • Cmd + F

Maximize Any Panel

  • Hover and press the ~ (Tilde)

Hide or Show Layer Controls

  • Cmd + Shift + H

Kern Your Type

  • Option + Right or Left Arrow Keys

Save the Current Frame

  • Cmd + Opt + S

Center Shape Layer Anchor Points

  • Opt + Cmd + Home

Show And Hide the Grid

  • Cmd + ‘ (Apostrophe)


Categories
Quick Reviews

Quick Review: Previewing Compositions

Buffering…

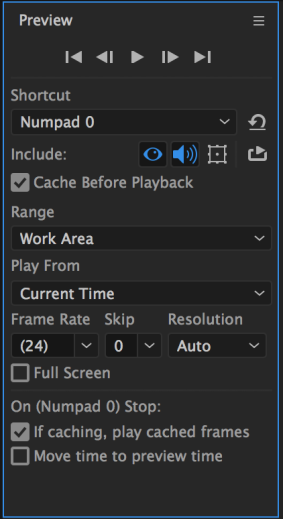
There are actually several different ways of previewing the project you are working on in After Effects.  The Preview window contains lots of options, which may be hidden until you expand the panel to its full dimensions.  By default, there are three basic methods of previewing your composition, each of which can be further customized.  Note that these may change slightly from version to version of After Effects, but they can always be customized in the Preview panel.

Pressing the space bar will preview your composition without cacheing the frames first.  This means that After Effects will attempt to play what you are working on in real time, as best it can.  If you have a fast computer or a simple composition, this may work fine.  However, your playback may start to slow down or stutter.

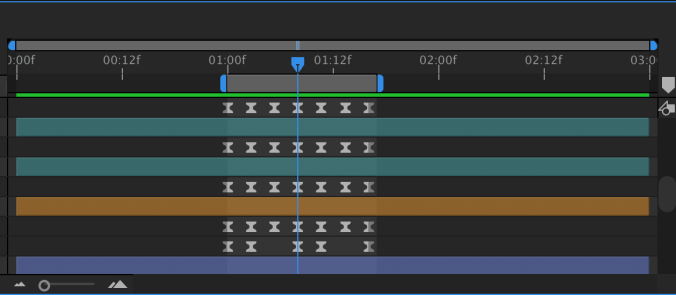
Pressing the zero key on your number pad will cache the frames in your composition before playing them back.  This is called a RAM preview – essentially, After Effects is temporarily rendering your composition before playing it back.  You may have noticed a green line near the top of the timeline panel.  Areas that are green have been cached and should play back relatively smoothly.  When you press the zero key, that green line will gradually fill up.  When it fills the timeline – or when you press zero again – the preview will play.  Note that you must press the zero key on the number pad for a RAM preview – not the zero key in the numbers along the top of the keyboard.

The last type of preview is an audio preview, which is fairly self-explanatory.  You activate an audio preview by pressing the period key on the number pad (again, it must be the one on the number pad).  This will play only the audio in a composition – no video.  When doing an audio preview, you may find it helpful to see a waveform of the audio being played.  To do this, simply highlight a layer in the timeline with audio and press twice quickly.

One nice thing about the bevy of preview options in After Effects is that you can really customize how they operate.  In the preview panel, you’ll find options for resolution, sound, looping, and much more.  You can choose whether the preview plays from the beginning of the composition or from wherever the playhead is.  If you always want your preview to play in full screen mode, there is an option for that.  Because previewing footage in After Effects is so intensive, it’s extremely helpful to have these options.

Categories
Quick Reviews

Quick Review: Exporting Projects

Exporting

The process of turning your After Effects composition into a finished video can be a little confusing.  Let’s quickly review the process.

Your first step should be trimming the timeline so that only the section you want will be exported.  When you create a new composition, you are asked to define its length, but if you need to change its length, you can do so by going  to  Composition>Composition Settings… or using the Cmd+K keyboard shortcut.  Changing the duration in the composition settings window that appears will either add or subtract time from the end of the composition.  However, you can also trim the composition down from within the timeline panel.

At the beginning and end of the timeline, you’ll find blue handles – these define the “work area.”  (There are actually two sets of blue handles – the smaller ones can be used to zoom the view of the timeline in and out.)  You can think of the work area handles as After Effects’ equivalent of an in and out point.  If you drag the work area handles to the section of the timeline you want to keep, then right-click on the lighter area directly between them, you’ll see a few options appear.  Select “Trim Comp to Work Area” to remove everything outside the handles and shorten the length of the composition.  However, even if you don’t want to trim the comp down, you should use the blue handles to choose the area you want to export.

Once you have your work area defined, you should export your composition using the Render Queue.  The Render Queue exists as a panel in After Effects – it may show up as a tab next to the compositions in the timeline (otherwise, you can always find it under the Window dropdown at the top of the screen).

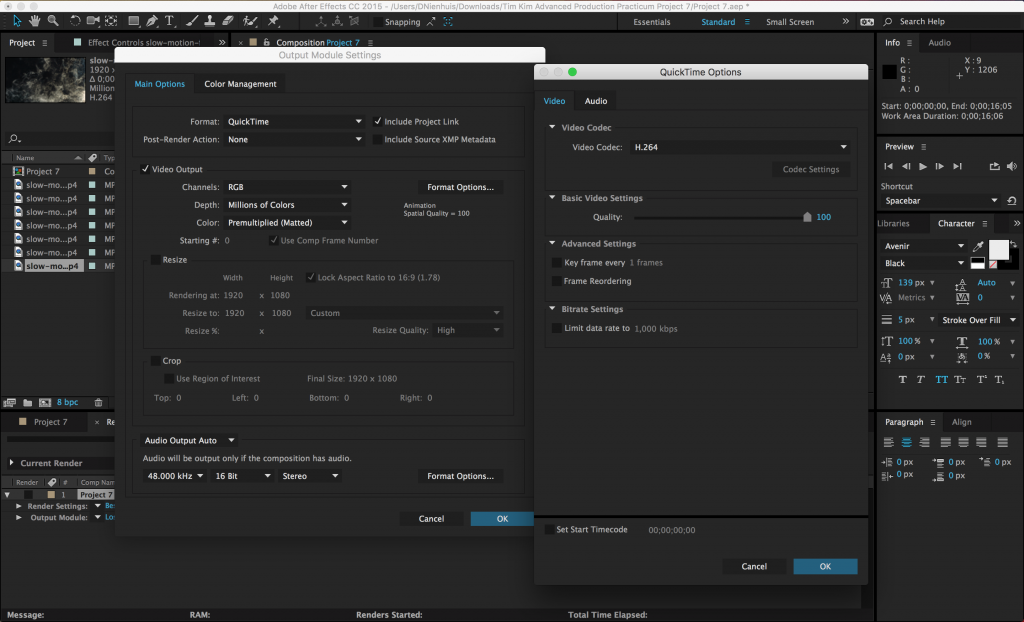
To add a composition to the Render Queue, open the composition in the timeline, then go to Composition>Add to Render Queue.  The name of the composition should then appear in the Render Queue panel.  Before you hit the “Render” button, you’ll need to set a few parameters.  Unless something has been changed, everything in the Render Settings section should be fine at the default values.  The Output Module is where you actually make changes to the file type and codec, so click on that to bring up a window with lots of options.  For our purposes, just click on “Format Options…” and change the video codec to H.264.  Click OK to close each window.  Finally, set the file’s destination by clicking on the text next to “Output To:”.

So, to recap: start by defining the work area you want to export in your composition, then go to Composition>Add to Render Queue from the top menu, click on the word “Lossless” next to “Output Module”, choose QuickTime as the format, click “Format Options…” and choose H.264.  Click “OK” on the two open windows to get back to the Render Queue, click on the blue text (it may say “Not yet specified”) next to “Output To” and choose the destination and name of the file.  Click the blue “Render” button in the corner, and your video will be created.